 |
A Simple RFM Services client application in ASP.NET |
|
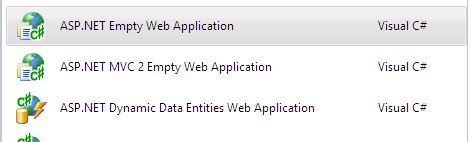 Visual Studio 2010 new ASP.NET Project |
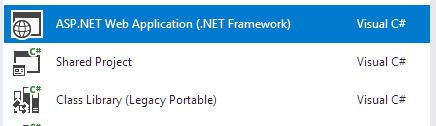 Visual Studio 2017 new ASP.NET Project |
The first task is to give your new application the means by which it can communicate with the Web Services server. That is, to add a client framework that provides the link between the application and the RFM Web Services server. There are several ways to go about this, depending on whether you choose to communicate with the RFM Web Services server via the SOAP 1.1 or via the REST interface (see a short review of SOAP vs REST).
REST Interface
REST-based service calls rely heavily on the pre-existing elements of the HTTP protocol. As such, client support
for them requires only the ability to make HTTP requests, and receive the results. .NET provides a variety of classes
capable of doing this, for example
HttpClient in .NET 4.6 and later, or HttpWebRequest
for earlier versions of .NET. Note that all RFM Web Services REST calls use the HTTP POST method, and encode the message body using JSON.
SOAP 1.1 Interface
SOAP calls are more complicated than REST as they require that the HTTP request body include XML that satisfies a particular
schema. Most languages and the IDEs that support them provide automation facilities so the programmer does not need to
be exposed to this XML in any way. .NET and Visual Studio are no different in this regard. Visual Studio allows applications
to consume SOAP services by creating a Service Reference. When a Service Reference is first created, the IDE reads the WSDL presented by the
Web Service and uses it to create a wrapper class that exposes one method for each operation of tmakes the remote service calls as easy to invoke as calling
a method on a local .NET object. Note that the WSDL for the demonstration RFM Web Services server can be read from:
http://rfmdemoserver.azurewebsites.net/RFMWebService.svc?wsdl.
RFM Web Services Client
RFM has encapsulated both SOAP and REST-based client access to RFM Web Services in the RFM Web Services Client.
Including this DLL in your project:
RFMWebServiceClient that encapsulates both the REST or SOAP interfaces,
and hides which one is being used to actually communicate with the server. Using this class, RFM Web Service
operations can be called in client code simply by invoking a method in the RFMWebServiceClient class and
setting a parameter to indicate whether the call will be made as REST or SOAP.
In this example, we'll use the RFMWebServiceClient since it does much of the background work required to
interface our small application to RFM Web Services and manage the connection as the applications runs.
To utilize the RFM Web Services client in the app we are building:
RFMWebServceClient.dll as a reference to the project. |
 |
Once the client interface has been determined and installed, it must be configured so that it can find the RFM Web Services server.
You will need to know the URL, of the RFM Web Services host you are connecting to. If you are connecting
to the public RFM Web Service demonstration server, you can use the URL: http://rfmdemoserver.azurewebsites.net/
The way you configure this URL in the software depends on the client you are using. If you are using your own REST client, you can specify
the URL each time you create a new request object. If you are using the SOAP client or the RFM Web Services Client, you should
specify the RFM Web Services host URL in the applications configuration file, usually web.config for web-based applications.
web.config file for editing.appSettings and system.serviceModel, and the settings
within them, are included (use your host URL as appropriate):
Note:
DefaultClientProtocol setting tells the RFM Web Services Client which protocol you prefer that it uses.
This setting is not required if you are not using the RFM Web Services Client.
<endoint> named "RFMRestService" is read by the RFM Services Client and is used to establish the
URL to which the REST requests will be sent.
<endoint> named "BasicHttpBinding_IRFMWebService" is also used by the RFM Services Client, which
embeds a wrapper around a Service Reference that will attempt to connect to the RFM Web Services services at the address
specified in this endpoint.
This entire sequence events can be largely automated using the framework provided in the RFM Web Services Client. To enable
this, the following line should be added to the Page_Load() handler in the "code behind" .cs file
associated with your .aspx page.
The Handle() method filters the HTTP Request parameters searching for one named "RFMAjaxMessage".
If this exists in the request, Handler() invokes the appropriate Web Service, and marshalls the return result.
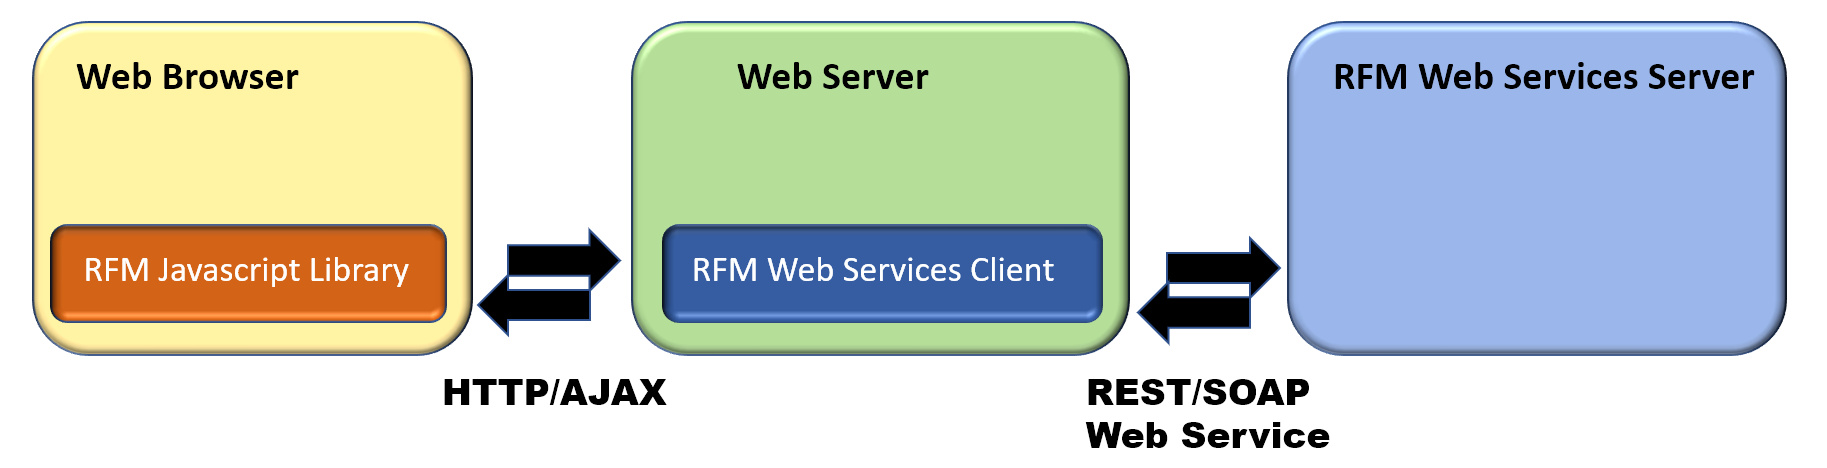
The high level architecture of the various RFM elements and the components that host them is shown in the diagram below.
In this step, we add our first web page to the application and create a login panel that the user can use to enter their username and password. We then make an Ajax call to the web server, which is relayed to the RFM Web Services to create a new session, authenticated by the user and password.
Note: We make extensie use of AJAX in this example since this usually provides for a more fluid, interactive user expereience by reducing the number of complete page refreshes required.
<body> section of the code to produce the panel shown
(for clarity, styling code has been omitted. Feel free to add any desired styling to the elements, or refer to the
source code for this example for styling.):

|
onclick event of the Login button is handled by the function Login.
The next step is to add the code that defines the Login function to a <script> block
in the <head> block of the page. The javascript file rfm_lib.js defines an
RFM object that provides a number of utility routines that make it easier to work with RFM objects in the
web browser. Before doing anything else, this script file should be included in the head of the HTML code for the page.
Login() function) collects data from the elements in the on-screen form and dispatches them as
an AJAX request, and the second (HandleLoginResponse()) handles the asynchronous response received when the AJAX call returns.
(we will fill in what happens if the login is successful in the next step. If it fails, we just write the failure message).
// Do this in the next step with the code shown below.
Note the use of the function RFM.getPanelHTML(). This makes an AJAX call which the RFM Web Services Client
Handler method passes to the RFM Web Services server. The server responds by looking up the model,
and automatically generating the HTML necessary to render the request panels. These are RatingFinancialsPanel,
which renders the financial parameters input panel shown left (below), and RatingQualitativePanel
which renders the questionnaire to the right.

Note that no HTML was ever hand written to create the panels shown above. They were all automatically computed
by the getPanelHTML functions.
Once the form fields have all been filled, clicking the Rate button will send
the information to RFM Web Services's Rate()
operation. This accepts a model identifier and group of parameters, and returns the calculated
probability of default (PD). To enable this using the RFM Javascript library, we need only add the following
javascript in our .aspx file to handle the onclick event from the Rate
button:
Again, note that the rating event is handled in two parts. First, DoRating() collects
the data from the on-screen forms and calls the RFM Javascript library function RFM.rate().
Internally, this makes an AJAX call, which must be handled when it returns. This second part of the process
is impelemented by HandleRatingResult().
Also note the use of the RFM Javascript library
function RFM.getAjaxFormData(). This locates the DOM element in the current HTML document whose id
is passed as function's first argument, and finds all the data-bearing elements it contains, either directly or
indirectly. For example, it will search for all <input>, <select>,
<textarea>, and certain <div> elements and build a JSON object
that records each identified data value as a property:value pair. This object (whose variable
name is data in the example above) can then be used to send data to an RFM AJAX call.
This is illustrated below, where the form values on the left result in a JSON object passed to RFM.DoRating()
as shown on the right. The questionnaire values are not shown but the JSON object is still populated with their results,
(specifically, the 0-based index of the selected item).
 |
|
webservices and password: sampler019).